I think we can all agree that a developer needs a fine-tuned, well-running machine. By doing regularly scheduled maintenance to your development PC, you can avoid programming down-time. Yesterday my computer was performing sluggishly and I realized I was long overdue for a Defrag.
Prior to running Defrag on your computer, you should run a Scandisk to correct any drive errors. In Windows 98, (and this is likely similar in Windows 2000), go to your Desktop, open My Computer, right click on the drive on which you wish to run Scandisk, and then select Properties. A window will come up. Select the "Tools" tab.
The Error-checking status box will tell you when you last ran a Scandisk. Select the "Check Now" button. Another window will open. Select the "Thorough" radio button and the checkbox to "Automatically fix errors," then select the "Start" button.
I also noticed that when I ran a Scandisk from DOS, it found no errors. But when I ran it on the same drive from Windows, the Windows Scandisk version found and fixed several errors.
Once Scandisk has completed, select the "Defragment Now" button to begin the Defragmentation process.
It is important that you do not have any applications open and are not using your PC while you are running these tools, as they won't be able to complete and will keep restarting the process. Run these during evenings or times you won't need to be working on your PC.
Unfortunately, when I ran Scandisk on my C: drive, it kept restarting and I eventually got the message that Scandisk had restarted 10 times due to another application writing to the hard drive.
I had shut down every application, closed everything in my task bar, and even shut down my network, but still I kept getting this error. I decided to bypass the Scandisk and go straight to the Defrag, but it would never get past 0% completion while checking for errors.
If this problem ever happens to you, here's what I found out to fix it.
Do a Restart or Shutdown and Restart (I prefer a Shutdown so I can do a clean boot), and while restarting, hold down the F8 key. This will bring up a DOS option to boot Windows in Safe Mode. Select the Safe Mode. Your PC will now open with no applications running in the background.
Follow the same instructions above for running Scandisk and Defrag. Now both should successfully complete on Drive C.
Source http://www.shiningstar.net/articles/articles/misc/scandefrag.asp?ID=aw
Wednesday, November 4, 2009
How to Set BIOS to Boot from CDROM:
All modern Computer Systems manufactured in the last years, support boot from cd feature, but it may be required to configure this feature in bios or previous owner of your computer system may have disabled this feature or may have changed the boot priority sequence )
When you start your computer, check the boot-screen for setup key, In most newer pc it will be DELETE key, so make sure to check it.
This AmiBios Require you to press DEL key to enter setup
now you will see some similar screen and choose the BOOT option and choose Boot Device Priority and choose first boot device to CDROM and second boot device to HARD DRIVE You can press F10 to save settings.
On Award Bios you will see some similar screen and choose the right key to Enter setup
Now choose Advanced Bios Features
and set First Boot Device to CDROM and Second or third to HDD-0 and Press F10 to save it.
On some Dell Systems you can enter bios by pressing F2
Now choose Boot Sequence and then arrance 1 to CD-Rom by pressing - + and press space to enable it
Press ESC and choose save settings and exit
On some Dell Systems you can enter bios by pressing F2
Sometimes you can press F12 to temporary boot from cd on some Dell Systems
Press F2 to enter bios setup
and set Boot Sequence to A,CDROM,C and Press Esc and then F10 to save it.
Some Computer has Option to temporary boot from Cd/Hdd/Floppy/Usb Device, Just keep tapping the F8 button to get Boot Menu and Now choose your manufacture of CDRom.
Source http://www.hiren.info/pages/bios-boot-cdrom
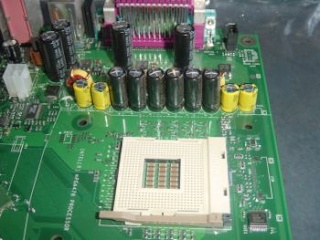
Dell 400SC Motherboard Capacitor Problems
This page documents some problems that I have run into with two Dell 400SC Server motherboards.
Motherboards that were built in a specific time period seem to be developing problems with electrolytic capacitors that are failing sometime after the first year of service.
Similar problems were found with a variety of motherboards in the 2000-2001 timeframe. Even though the problems are similar, it seems that the problems with the Dell 400SC are unrelated to the large quantity of poor quality capacitors that were on the market in 2000-2001. This batch of problems seems to be more of a specific quality control problem at a single manufacturer during a particular time period.
See these links for some more details on the problems the sometimes occur with electrolytic capacitors on modern motherboards, where high frequency currents seem to push the envelope of what these devices can be expected to handle:
* Badcaps.net tracked the initial set of motherboard capacitor problems.
* Tecnopolis Enterprises is an outfit in Winnipeg that has good information on the issue, and provides a repair service: http://www.tecnopolis.ca/tecnopolis/leakycaps.html
* Aaltonen hosts a message board that discusses the 400SC (and some other Dell machines). Here is a thread that discusses the 400SC specific problem: http://www.aaltonen.us/forums/viewtopic.php?t=2376
Here are some photos of the problematic capacitors on my motherboards: Motherboard 1 is Revision A02 - it did not exhibit any noticeable problems when running; however, the capacitors look worse than my other motherboard, as a couple of them are 'oozing' whatever is inside those things.
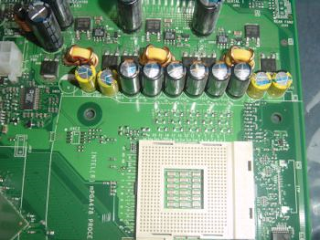
Motherboard 2 exhibited numerous strange failures - out of memory conditions, refusing to run programs due to inadequate permissions, reboots, etc. I spent a significant amount of time trying to fix these problems, assuming that they were 'malware' related. After trying to diagnose and/or fix the problem with several anti-virus and spyware removal utilities, I happened across the thread on the Aaltonen forum describing the capacitor problem. When I inspected the motherboard, sure enough the capacitors were bulging.
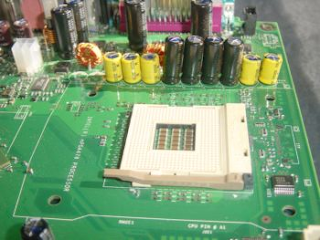

And this is a photo of a plastic standoff that Dell uses to attach the heatsink bracket to the motherboard/motherboard-tray. I damaged it when preparing the motherboard for shipment - I think that it's probably still OK to use.
Source http://www.interslice.org/dell400sc/capacitors
Motherboards that were built in a specific time period seem to be developing problems with electrolytic capacitors that are failing sometime after the first year of service.
Similar problems were found with a variety of motherboards in the 2000-2001 timeframe. Even though the problems are similar, it seems that the problems with the Dell 400SC are unrelated to the large quantity of poor quality capacitors that were on the market in 2000-2001. This batch of problems seems to be more of a specific quality control problem at a single manufacturer during a particular time period.
See these links for some more details on the problems the sometimes occur with electrolytic capacitors on modern motherboards, where high frequency currents seem to push the envelope of what these devices can be expected to handle:
* Badcaps.net tracked the initial set of motherboard capacitor problems.
* Tecnopolis Enterprises is an outfit in Winnipeg that has good information on the issue, and provides a repair service: http://www.tecnopolis.ca/tecnopolis/leakycaps.html
* Aaltonen hosts a message board that discusses the 400SC (and some other Dell machines). Here is a thread that discusses the 400SC specific problem: http://www.aaltonen.us/forums/viewtopic.php?t=2376
Here are some photos of the problematic capacitors on my motherboards: Motherboard 1 is Revision A02 - it did not exhibit any noticeable problems when running; however, the capacitors look worse than my other motherboard, as a couple of them are 'oozing' whatever is inside those things.


Motherboard 2 exhibited numerous strange failures - out of memory conditions, refusing to run programs due to inadequate permissions, reboots, etc. I spent a significant amount of time trying to fix these problems, assuming that they were 'malware' related. After trying to diagnose and/or fix the problem with several anti-virus and spyware removal utilities, I happened across the thread on the Aaltonen forum describing the capacitor problem. When I inspected the motherboard, sure enough the capacitors were bulging.


And this is a photo of a plastic standoff that Dell uses to attach the heatsink bracket to the motherboard/motherboard-tray. I damaged it when preparing the motherboard for shipment - I think that it's probably still OK to use.
Source http://www.interslice.org/dell400sc/capacitors
Windows 7 Beta step by step Installation procedure
Microsoft recently announced the public release of its new operating system Windows 7 beta version. This is available for download both for x86 (32-bit) and X64 (64-bit) hardware. For more information on system requirements and downloads, click here
If you have already installed WIndows Vista or Windows Server 2008 from scratch then this shouldn’t look too different for you.
Boot with the installation media and once past through the initial splasdh screen, select the Language and regional settings including keyboard layout and click Next.
Click Install Now button
windows7-2
Accept the License terms and click Next
windows7-3
Select Custom (advanced) option to perform a fresh installation
windows7-4
Select the disk and partition it if necessary and click next
windows7-5
This should start copying the files, expand it and perform feature and update installation and reboot your PC.
windows7-6
After reboot the installation continues the configurations and reboot again for first login.
windows7-7 windows7-8
Windows will take you through the initial setup of your PC, starting with setting up a user and the name of the PC. Once entered, click next
windows7-9 windows7-10
Set the password for the user and click Next
windows7-11
Enter the product key. At the time of Download, Microsoft would have provided you with a product key for evaluation valid until the 1st July 2009. Enter the key and click Next
windows7-12
Setup Windows Updates as per your requirement (default to install recommended and important updates is recommended)
windows7-13
Set the date and time for your PC and the Day light savings for your country (if any) and click next
windows7-14
Setup your Network type. This should try and connect to your Network
windows7-15
Windows will then setup a password for your homegroup (similar to the Workgroup in Windows XP and earlier). You can choose to skip this step if you want to configure it later.
windows7-16
This should finalize the settings and launch you straight into your desktop.
windows7-17 windows7-18
There you go, your new Windows 7 Beta up and running. First outlook looks to be good for a Beta version of a Microsoft Operating System.
windows7-20 windows7-21
Have fun!!!
Gallery
The following is the Screenshot gallery from Windows 7 beta installation…
Source http://www.windowsreference.com/windows-7/windows-7-beta-step-by-step-installation-procedure/
Windows 2000 Professional Full Install Procedure
NB: If rebuilding an existing, working computer, first:
- Backup all user data
- Write down all device information (names of cards etc.) and IP settings.
0. CMOS/BIOS SETTINGS (Hit DEL or F2 during startup, according to prompt)
Ensure that boot sequence is CD-ROM, Floppy, Hard Drive
Ensure that Plug-and-Play (PNP) OS is enabled
1a. If computer is incapable of booting from CDROM, then first prepare four install floppies, using CDROM. Boot from floppy, and it will prompt to load all four into RAM. (This procedure takes about 10 minutes.) Insert Windows 2000 Full Install CDROM.
1b. Otherwise, insert Windows 2000 Full Install CDROM and reboot.
2. Hit ENTER to install Windows 2000.
3. Hit C to continue.
4. Hit the F8 key to agree to license agreement.
5. Hit D to delete any existing disk partitions.
6. Hit C to create new partition.
7. Hit ENTER to accept the default (one big partition.) Note there may be some space left over. That’s OK.
8. ENTER to install windows on this partition.
9. ENTER to format the partition as NTFS.
10. Wait while the drive is formatted, files copied from the CD. The machine will reboot itself.
11. ENTER to accept locale and keyboard settings.
12. Type computer name and school name in the appropriate slots, hit ENTER.
13. Type the computer name. Type the Administrator password TWICE. Password will show as all asterisks. ENTER.
14. Modify the date, time and time zone as needed. ENTER.
15. Click to select “Custom settings”. ENTER.
16. Click to remove the check next to “File and Printer Sharing for Microsoft Networks”. ENTER.
17. Leave “This computer is not on a network or is on a network without a domain” selected (or if a PDC is available, selected the domain option). Type EPAHS in the Workgroup (or Domain) field. ENTER.
18. Remove CD from drive. ENTER.
Computer will reboot. ENTER.
19. Select “User must enter a user name and password to use this computer.” ENTER. ENTER again.
20. Log into computer as Administrator, using the password you entered in step 13. ENTER.
21. Disable the WELCOME Screen.
22. Double-click the “Connect to the Internet” icon on the desktop. Select “I want to set up my Internet connection manually, or I want to connect through a local area network (LAN).” OK.
23. Select “I connect through a local area network (LAN).” ENTER. ENTER again.
24. Select NO to setting up email. OK. OK again.
25. Right-click on “My Network Places”. Click Properties.
Right-click on “Local area network”. Click Properties.
Click on “Internet Protocol (TCP/IP)” so that it turns blue. Click Properties.
Select “Use the following IP address”.
Type in the IP address, subnet mask, gateway and DNS addresses you wrote down before. Click OK.
26. Change the Resolution (by right clicking on the desktop and selecting Properties:
24 bit True Color
800 x 600
Advanced -> Adapter -> Refresh Rate -> 75 Hz
YES ... OK ... OK ... OK ... (Joe Pesci mode)
Now adjust monitor physical wheels as needed.
27. Set the ScreenSaver to show the computer name:
Right-click on desktop, select Properties
-> Screensaver Tab
-> Text = “PC01 Welcome To EPAHS PC01”
-> Speed = Medium
-> Location = Random
-> Font = Terminal
-> Size = 72
-> Wait = 10 minutes
-> Color = your choice
Energy Saver: Turn off monitor after 30 minutes
Source http://www.learningtech.org/services/cto/epahs/win2khtml/win2kinstall.html
Windows Vista consumer security software providers
We recommend that you install security software to help protect your computer from viruses and other security threats, and that you keep your security software up to date.
Some companies use products that appear to be antivirus programs to install viruses or malware on your computer. When you install the program, you might also be installing the virus or other malware, without knowing it. Many companies, including those listed on this page, distribute antivirus programs. You should carefully investigate the source of antivirus and other products before downloading and installing them.
The companies listed below provide consumer security software that is compatible with Windows Vista. Just click the company name to see the Windows Vista-compatible product they offer. For business security software that is compatible with Windows Vista, please visit the Windows Vista Compatibility Center or contact your security vendor of choice.
Important: Before you install antivirus software, check to make sure you don't already have an antivirus product on your computer. If you do, be sure to remove the product you don't want before you install the new one. It can cause problems on your computer to have two different antivirus products installed at the same time.


Source http://www.microsoft.com/windows/antivirus-partners/windows-vista.aspx
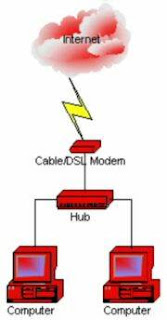
Home Network Setup - Setting up a Local Area Network
....With computers getting cheaper and cheaper these days, it is not uncommon for a household to have more than one PC. If that describes you, then you have probably found yourself in the situation where you wished you could access the other PC to retrieve a file, use the printer attached to the other PC, play multi-player computer games, or most importantly share your broadband Internet access such as cable or DSL modem with the other PC.
To accomplish this all you need is a home network where you connect two or more PCs. There are several ways of doing this with the main difference being cost, security, and reliability. Let's first look at the different scenarios.
Your current setup
Most likely, your current configuration looks like this:

Your cable/DSL modem plugs straight into the computer. The computer is exposed to the public Internet (indicated by the color red). There is no connection for more than one computer. You only have one IP address from your ISP.
Option #1: Multiple IP addresses
An easy way of getting the second PC online is to install a network card in it, buy a hub, plug both PCs and the cable/DSL modem into the hub, call your ISP and get a second IP address and configure the second PC accordingly.
It is what your ISP most likely will try to talk you into doing.
Advantages:
* the two PCs are independent from each other
* relatively easy setup
Disadvantages:
* Both PCs are exposed to public Internet
* Enabling file sharing adds security risk
* Higher monthly ISP cost for additional IP addresses
Option #2: Internet Connection Sharing via Software
In this scenario, you install a second network card in the computer that is connected to the Internet, install a network card in the second PC, connect them via a CAT5 cable. You configure the connection between PC 1 and PC 2 as a private network, then install and configure Internet Connection Sharing software (ICS) on PC 1, lastly configure PC 2 to access the Internet via PC 1.

Probably the cheapest solutions of them all, but also the least reliable one.
Advantages:
* cheap, only requires 2 network cards and Cat5 cable
* ICS software is available for free with newer versions of Windows or online as freeware
* No additional ISP cost
Disadvantages:
* One PC is exposed to public Internet
* Can be difficult to configure
* If PC 1 is shut down or broken, PC 2 cannot get online
* Can be unreliable
* Limited number of PCs
Option #3: Using a hardware router/gateway/firewall device
In this scenario, you install a hardware router/gateway/firewall device, connect the public side to your cable/DSL modem, connect the private side to a hub, connect all PCs to the hub, configure all PCs for your private network.
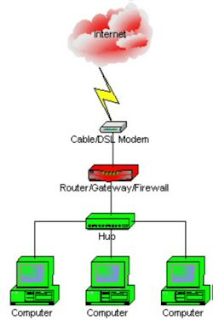
While the costliest solution, by far the safest, most reliable, and most scalable one. Highly recommended.
Advantages:
* All PCs are protected by firewall (indicated by the color green)
* File sharing between PCs is safe
* No additional ISP cost
* Connect many PCs to home network without additional cost
* Easy PC configuration due to DHCP server in gateway device
* Optional additional functionality with gateway-integrated wireless access point, print server, DMZ, content filtering, and more
Disadvantages:
* Can cost several hundred dollars depending on gateway device and features
* Somewhat of a learning curve
As you have probably figured out by now, option #3 is the most desirable solution because it gives you a protected private network, it is a very stable solution, it is easily and extremely expandable, and it gives you the most features.
Note: This article assumes that your cable/DSL modem uses an Ethernet connection, NOT a USB connection because it will eliminate options #1 and #3. If your ISP gives you a choice, insist on getting the modem with an Ethernet connection.
Source http://www.pcnineoneone.com/howto/hmnetwk1.html
To accomplish this all you need is a home network where you connect two or more PCs. There are several ways of doing this with the main difference being cost, security, and reliability. Let's first look at the different scenarios.
Your current setup
Most likely, your current configuration looks like this:

Your cable/DSL modem plugs straight into the computer. The computer is exposed to the public Internet (indicated by the color red). There is no connection for more than one computer. You only have one IP address from your ISP.
Option #1: Multiple IP addresses
An easy way of getting the second PC online is to install a network card in it, buy a hub, plug both PCs and the cable/DSL modem into the hub, call your ISP and get a second IP address and configure the second PC accordingly.

It is what your ISP most likely will try to talk you into doing.
Advantages:
* the two PCs are independent from each other
* relatively easy setup
Disadvantages:
* Both PCs are exposed to public Internet
* Enabling file sharing adds security risk
* Higher monthly ISP cost for additional IP addresses
Option #2: Internet Connection Sharing via Software
In this scenario, you install a second network card in the computer that is connected to the Internet, install a network card in the second PC, connect them via a CAT5 cable. You configure the connection between PC 1 and PC 2 as a private network, then install and configure Internet Connection Sharing software (ICS) on PC 1, lastly configure PC 2 to access the Internet via PC 1.

Probably the cheapest solutions of them all, but also the least reliable one.
Advantages:
* cheap, only requires 2 network cards and Cat5 cable
* ICS software is available for free with newer versions of Windows or online as freeware
* No additional ISP cost
Disadvantages:
* One PC is exposed to public Internet
* Can be difficult to configure
* If PC 1 is shut down or broken, PC 2 cannot get online
* Can be unreliable
* Limited number of PCs
Option #3: Using a hardware router/gateway/firewall device
In this scenario, you install a hardware router/gateway/firewall device, connect the public side to your cable/DSL modem, connect the private side to a hub, connect all PCs to the hub, configure all PCs for your private network.

While the costliest solution, by far the safest, most reliable, and most scalable one. Highly recommended.
Advantages:
* All PCs are protected by firewall (indicated by the color green)
* File sharing between PCs is safe
* No additional ISP cost
* Connect many PCs to home network without additional cost
* Easy PC configuration due to DHCP server in gateway device
* Optional additional functionality with gateway-integrated wireless access point, print server, DMZ, content filtering, and more
Disadvantages:
* Can cost several hundred dollars depending on gateway device and features
* Somewhat of a learning curve
As you have probably figured out by now, option #3 is the most desirable solution because it gives you a protected private network, it is a very stable solution, it is easily and extremely expandable, and it gives you the most features.
Note: This article assumes that your cable/DSL modem uses an Ethernet connection, NOT a USB connection because it will eliminate options #1 and #3. If your ISP gives you a choice, insist on getting the modem with an Ethernet connection.
Source http://www.pcnineoneone.com/howto/hmnetwk1.html
Video Card Upgrade Install Guide
Installing The Standard VGA Driver
The window changes to look like this to indicate that Windows is ready to install the driver. Click on the "Next" button.
Update device driver wizard with GeForce2 Pro still installed
The window changes to look like this to announce that Windows has installed the driver. Windows has not really installed the driver yet. It's got the computer set up to do the install. Click on the "Finish" button.
Update device driver wizard with GeForce2 Pro still installed
Click on the "Apply" button.
Update device driver wizard with GeForce3 Ti 200 still installed
Click on the "Close" button.
Display Properties with GeForce3 Ti 200 still installed
Click on the "Yes" button and the computer will restart to actually, really install the selected drivers.
Update device driver wizard with GeForce2 Pro still installed
The screen goes black and the message "Windows is now restarting..." is displayed. If, during this reboot, the Hardware Wizard gives a message to the effect that new hardware has been detected and prompts to install the drivers then once again select the "Standard PCI Graphics Adapter (VGA)". When the computer boots back to the desktop, the colors and the display probably look very different than they did before. That's because the computer is now using the standard VGA adapter, which is very basic. Let GoBack settle down.
For replacing an NVIDIA based video card like I did, read the Driver Cleaner ReadMe file and follow the steps. There are not many steps and the step are not difficult, but there's no point in repeating them here. On the other hand, I found the text shown below from the Driver Cleaner help file quite helpful, so I've mentioned it here to make sure you see it. Execute Driver Cleaner to remove any remaining remnants of the NVIDIA video card drivers. The steps for Driver Cleaner require that the computer be restarted in "Safe Mode". See this How to Start a Windows 98-Based Computer in Safe Mode article from Microsoft if you're not sure how to do that. If, during the reboot, the Hardware Wizard gives a message to the effect that new hardware has been detected and prompts to install the drivers then once again select the "Standard PCI Graphics Adapter (VGA)".
How to use DriverCleaner
For replacing an ATI based video card, execute CATALYST Uninstaller (cat-uninstaller.exe). Follow the prompts and restart the computer when prompted. If, during the reboot, the Hardware Wizard gives a message to the effect that new hardware has been detected and prompts to install the drivers then once again select the "Standard PCI Graphics Adapter (VGA)".
With the appropriate driver cleaner utitlity complete, if you used the System Configuration Utility to reach Safe Mode as the article describes (and like I did) then now is a fine to use it again to disable the startup menu since you'll no longer need the option of starting in Safe Mode.
If you're upgrading from an integrated graphics chipset, meaning a chipset built-into the motherboard, so that there is currently no video card in your computer then it's worth noting that some motherboards require a simple BIOS change in order for the installed video card to be recognized. Consult the documentation that came with your motherboard or computer for more information.
Source http://www.mysuperpc.com/vcu/install_standard_vga_driver.shtml
Reinstalling Windows Mellinum
1. First of all, back up all crucial non-Windows data. That includes your mail program data, text and image files, and anything else you can't reinstall from a CD later. Be thorough in your backing up, because everything on the drive will be destroyed during this process.
2. Now find the boot disk you got with your Windows ME installation CD. If you want, you can make a new disk as follows:
1. Go to Start > Settings > Control Panel, and double-click Add/Remove Programs, then select the Startup Disk tab.
2. Put a diskette in your floppy drive and click Create Disk.
3. A boot disk will be made for you. This can take three to five minutes.
3. With the boot disk in the floppy drive, restart the machine. You will be presented with four options: * Help * Start with CD-ROM support * Start without CD-ROM support * Minimal Boot
4. Choose Start with CD-ROM support and wait for the machine to go through the start-up process. Once the A: prompt appears, type a:format c: and hit Enter. (Note to veterans: The /s command is no longer necessary and is not supported under Windows ME).
5. The system will reformat the drive, and then display the amount of free space. It will also prompt you to enter a volume label, which is the name of the hard disk. Enter anything you like, or simply hit the Enter key for no name.
6. If your drive has been sub-divided (also called "partitioned"), repeat the format procedure on the second partition. For example, if the D drive is a hard drive partition, type the command format d:
7. Now your hard drive is ready for a new installation of Windows ME. Put the Windows ME installation CD in the CD drive and type x:setup, where X is the CD drive letter. It is probably D.
8. Windows ME will then run the Scandisk utility on your hard drive to check for errors. Once it finishes, click Exit and let the rest of the installation proceed. Keep your Product Key handy (that's the really long code on the back of the CD sleeve) because you'll have to enter that before the installation proceeds. Upgrade copies of the Windows ME require you to have a previous version of Windows handy because the system will ask for it to verify you are eligible to install the upgrade. When prompted, you'll have to put it into either the floppy or CD drive for verification, depending on which operating system you are upgrading from. Be aware that there are three possible Windows ME products. A full version requires no previous software verification. An upgrade from Windows (about $169) requires the insertion of a Windows 95 disk or CD during the upgrade process. The upgrade from Windows 98 (about $85) requires the Win 98 CD.
9. The rest of the installation is pretty straightforward. Follow the prompts until the process finishes. You will be prompted to restart. Make sure you remove the floppy disk from the floppy drive, label it, and put it in a safe place. Also, be sure to keep the previous Windows CD with the upgrade package so you can verify you own it in the event of any future reinstallations.
Source http://www.cyberwalker.com/article/246
HOW TO INSTALL WINDOWS ME
Minimum System Requirements - suggestions in parenthesis.
*
150 Mhz Pentium or equivalent (300 Mhz or higher).
*
32 MBytes of memory (64 MBytes, 128 Mbytes is even better)
*
Free Disk Space (now is the time to buy that 7,200 RPM drive)
o
Compact install 200 MBytes
o
Typical 350 MBytes
o
Full 400 MBytes
o
If saving system files from prior version of Windows, to allow for uninstalling Win Me, add 150 Mbytes
o
On an average system with Office, graphics, etc. I would allow a four Gig (GigaByte) partition for the C: drive; Two Gigs is almost too small for this hog.
*
VGA or higher monitor
*
CD-ROM or DVD drive
*
Mouse
To Upgrade or Not? I did the initial install as an upgrade to my computer and a second one as a clean install (installation on a new hard disk or one that has been taken-down to "bare metal" by removing the primary partition). As soon as that 7,200 RPM drive arrives I will do a clean install (see below) on my computer. Whenever one installs a new version of Windows it is usually much better to do a clean install. That gets rid of any problems that have developed in the old version through use and eliminates any lingering driver problems, etc.
Installing Directly from the CD. No can do. The various versions of the Windows Me CDs are not bootable like Windows 98 and Windows 98 Second Edition.
Copying cab files and Installing from a Hard Disk. Unless there are severe problems in prior installation attempts, there is no need to copy the Windows cab files (cabinet or compressed files containing the Windows files) from the CD to the hard disk and installing from the hard disk (which is done just like it is for Windows 98). Unlike Windows 98 and 98 SE and like Windows 95 OSR2, the Windows Me Setup copies the cab files to the hard disk drive (C:\windows\options\install) and installs Windows from there. Windows will no longer be asking for the Windows CD when you are on the road with your laptop while the CD remains behind in a desk drawer in your office (most annoying).
Before Installing (Upgrades and Clean Installs)... Back-up your critical data. This is advisable for upgrades as well as clean installs. I use Microsoft Backup to back-up critical data to a file server or another computer on a network or to a second drive connected to the computer as a slave. One could also use a Zip, tape, or CD-RW drive as a backup device with this software. My critical data consists of: C:\My Documents, C:\Windows\Cookies, C:\Windows\Favorites, C:\Windows\lbyard.pwl (password file), and few other directories and files specific to me. Of course, you will have to reinstall all of applications if you do a clean install and restore your critical data.
If you are installing a new hard disk, your old hard disk becomes a backup. Be sure it is not connected to the new drive when partitioning, formatting or installing Windows on it.
I always try to have two backups before cleaning a drive. I have seen backup programs fail to make a good backup (especially if tape is used), old disk drives dropped, data on old disk drives wiped-out by human error, and still other disk drives that decided to die at the very moment they were evicted from their beloved homes.
Try to obtain the latest drivers for the motherboard and and expansion boards in your computer.
Flash the motherboard with the latest BIOS, if you feel competent to do so, and test the flash with you existing version of Windows.
If you are installing Windows Me on a newly constructed computer, I recommend installing Windows after the video board is installed and before the rest of the expansion boards are installed.
Source http://www.duxcw.com/digest/Howto/software/windows/winme/install/inst.html
*
150 Mhz Pentium or equivalent (300 Mhz or higher).
*
32 MBytes of memory (64 MBytes, 128 Mbytes is even better)
*
Free Disk Space (now is the time to buy that 7,200 RPM drive)
o
Compact install 200 MBytes
o
Typical 350 MBytes
o
Full 400 MBytes
o
If saving system files from prior version of Windows, to allow for uninstalling Win Me, add 150 Mbytes
o
On an average system with Office, graphics, etc. I would allow a four Gig (GigaByte) partition for the C: drive; Two Gigs is almost too small for this hog.
*
VGA or higher monitor
*
CD-ROM or DVD drive
*
Mouse
To Upgrade or Not? I did the initial install as an upgrade to my computer and a second one as a clean install (installation on a new hard disk or one that has been taken-down to "bare metal" by removing the primary partition). As soon as that 7,200 RPM drive arrives I will do a clean install (see below) on my computer. Whenever one installs a new version of Windows it is usually much better to do a clean install. That gets rid of any problems that have developed in the old version through use and eliminates any lingering driver problems, etc.
Installing Directly from the CD. No can do. The various versions of the Windows Me CDs are not bootable like Windows 98 and Windows 98 Second Edition.
Copying cab files and Installing from a Hard Disk. Unless there are severe problems in prior installation attempts, there is no need to copy the Windows cab files (cabinet or compressed files containing the Windows files) from the CD to the hard disk and installing from the hard disk (which is done just like it is for Windows 98). Unlike Windows 98 and 98 SE and like Windows 95 OSR2, the Windows Me Setup copies the cab files to the hard disk drive (C:\windows\options\install) and installs Windows from there. Windows will no longer be asking for the Windows CD when you are on the road with your laptop while the CD remains behind in a desk drawer in your office (most annoying).
Before Installing (Upgrades and Clean Installs)... Back-up your critical data. This is advisable for upgrades as well as clean installs. I use Microsoft Backup to back-up critical data to a file server or another computer on a network or to a second drive connected to the computer as a slave. One could also use a Zip, tape, or CD-RW drive as a backup device with this software. My critical data consists of: C:\My Documents, C:\Windows\Cookies, C:\Windows\Favorites, C:\Windows\lbyard.pwl (password file), and few other directories and files specific to me. Of course, you will have to reinstall all of applications if you do a clean install and restore your critical data.
If you are installing a new hard disk, your old hard disk becomes a backup. Be sure it is not connected to the new drive when partitioning, formatting or installing Windows on it.
I always try to have two backups before cleaning a drive. I have seen backup programs fail to make a good backup (especially if tape is used), old disk drives dropped, data on old disk drives wiped-out by human error, and still other disk drives that decided to die at the very moment they were evicted from their beloved homes.
Try to obtain the latest drivers for the motherboard and and expansion boards in your computer.
Flash the motherboard with the latest BIOS, if you feel competent to do so, and test the flash with you existing version of Windows.
If you are installing Windows Me on a newly constructed computer, I recommend installing Windows after the video board is installed and before the rest of the expansion boards are installed.
Source http://www.duxcw.com/digest/Howto/software/windows/winme/install/inst.html
Hard Disk Drive Setup - Partition and Format
This procedure explains how to setup a new hard disk. Warning - if you are setting up a hard disk which contains data, the following procedure would completely erase your hard disk and the data would be unrecoverable.
Before a new hard disk can be used it needs to be setup. This involves partitioning and formatting the hard disk. Windows 98 or ME boot disk contains the required software to perform this procedure. FDISK.EXE and FORMAT.COM are the files required in your bootable floppy disk. Start the partition and format procedure by booting your PC using a Windows boot disk. Make sure you set the BIOS so that the boot sequence is set to detect the floppy disk first. If your system has no problems booting you will be presented with a Windows boot disk menu. This gives you the option to start the system with or without CD-ROM support. At this stage you do not need the CD-ROM support, so choose the option to boot without CD-ROM support. You should end up in the MS DOS prompt A: (A drive). From A: command prompt type fdisk. You will be presented with following message:
Choose "Y" to enable large disk support.You will now be presented with the FDISK main menu as shown below.
From the menu, choose option 1 - Create DOS partition or Logical DOS drive. Another menu will present the following options.
Choose option 1 - Create primary DOS Partition. FDISK verifies the integrity of your drive and will ask you if want to use the maximum available size of your hard disk to create the primary partition and set it active. To keep things simple we will create one large partition. Choose "Y" to use maximum available space. When the partition has been created successfully you will be notified by the system. Your drive is now known as C: (C drive). Press "Esc" to return to the menu. Press "Esc" again to exit FDISK. You need to restart your system for the changes to take affect. Leave boot disk in the drive.When the system reboots, choose start without CD-ROM from the boot disk menu. While booting from floppy disk you might get error message like "Invalid media type reading drive C" this is OK for this stage as the hard disk is not formatted.
From A: command prompt type format c:You will get a message saying "WARNING, ALL DATA ON NON-REMOVABLE DISK DRIVE C: WILL BE LOST. Proceed with Format (Y/N)?".
Don't worry about the message as you do not have any data in the new hard disk. Choose "Y". The format will proceed and would show you a progress indicator. The time it takes to format a hard disk depends on the size and speed of the drive. This could be around 5-30 minutes. Once the format is complete you need to reset your system. You are now ready to install an operating system.
Source http://www.buildeasypc.com/sw/hddsetup.htm
How to Protect an Excel 2007 Workbook
Excel 2007 includes a Protect Workbook command that prevents others from making changes to the layout of the worksheets in a workbook. You can assign a password when you protect a workbook so that only those who know the password can unprotect the workbook and make changes to the structure and layout of the worksheets.
Protecting a workbook does not prevent others from making changes to the contents of cells. To protect cell contents, you must use the Protect Sheet command button on the Review tab.
Protecting a workbook
Follow these steps to protect an Excel 2007 workbook:
1.
Click the Protect Workbook command button in the Changes group on the Review tab.
Excel opens the Protect Structure and Windows dialog box, where the Structure check box is selected by default. With the Structure check box selected, Excel won’t let anyone mess around with the sheets in the workbook (by deleting them or rearranging them).
You can protect the structure and windows in a workbook.
You can protect the structure and windows in a workbook.
2.
(Optional) If you want to protect any windows that you set up, select the Windows check box.
When selected, this setting keeps the workbook windows in the same size and position each time you open the workbook.
3.
To assign a password that must be supplied before you can remove the protection from the worksheet, type the password in the Password (optional) text box.
4.
Click OK.
If you typed a password in the Password (optional) text box, Excel opens the Confirm Password dialog box. Re-enter the password in the Reenter Password to Proceed text box exactly as you typed it Step 3, and then click OK.
Unprotecting a workbook
To remove protection from the current workbook, follow these steps:
1.
Click the Unprotect Workbook command button in the Changes group on the Review tab.
2.
If you assigned a password when protecting the workbook, type the password in the Password text box and click OK.
Protecting a shared workbook
If you create a workbook with contents to be updated by several different users on your network, you can use the Protect and Share Workbook command to ensure that Excel tracks all the changes made and that no user can intentionally or inadvertently remove Excel’s tracking of changes. Follow these steps:
1.
Click the Protect and Share Workbook command button in the Changes group on the Review tab.
The Protect Shared Workbook dialog box appears.
2.
Select the Sharing with Track Changes check box.
Protect a shared workbook so that users cannot remove Excel’s tracking of changes.
Protect a shared workbook so that users cannot remove Excel’s tracking of changes.
3.
To assign a password that each user must supply before he or she can open the workbook to make any changes, type a password in the Password (optional) text box and click OK.
Source http://www.dummies.com/how-to/content/how-to-protect-an-excel-2007-workbook.navId-323068.html
How to create a bootable floppy disk for an NTFS or FAT partition in Windows XP
Summary
This step-by-step article describes how to create a bootable floppy disk for Windows XP to access a drive with a faulty boot sequence on an Intel-processor-based computer.
The Windows XP installation CD-ROM is a bootable disk and can be used to start Windows. When you use the Windows XP installation CD-ROM to start your computer, you can use the Windows Recovery Console to help recover the system software. For more information, click the following article number to view the article in the Microsoft Knowledge Base:
314058 (http://support.microsoft.com/kb/314058/ ) Description of the Windows XP Recovery Console
Note The procedure for RISC-based computers is different and not documented in this article.
Requirements
* A blank floppy disk
* The Windows XP CD-ROM or an operational Windows XP-based computer
Create a boot floppy disk by using a Windows XP-based computer
1. Format a floppy disk by using the Windows XP format utility. To do this follow these steps:
1. Insert the floppy disk that you want to use into the floppy disk drive.
2. Click Start, click Run, type format a:, and then click OK.
2. Copy the Ntldr and the Ntdetect.com files from the I386 folder on the Windows XP installation CD-ROM, from the Windows XP installation floppy disk, or from a computer that is running the same version of Windows XP as the computer that you want to access by using the boot floppy disk. To do this, follow these steps:
1. Insert the Windows XP installation media into the disk drive of the computer.
2. Click Start, click Run, type:\I386, and then click OK.
Note represents the root location of the installation media.
3. Right-click the Ntldr file, and then click Copy.
4. Click Start, click Run, type a:, and then click OK.
5. Click the Edit menu, and then click Paste.
6. Repeat steps 2b through 2e for the Ntdetect.com file.
3. Create a Boot.ini file, or copy one from a computer that is running Windows XP, and then modify the Boot.ini file to match the computer that you are trying to access. The following example lists how to create a Boot.ini file for a single-partition Integrated Device Electronics drive that has Windows XP installed in the \Windows folder:
1. Click Start, click Run, type notepad, and then click OK.
2. Type the following text:
[boot loader]
timeout=30
Default= multi(0)disk(0)rdisk(0)partition(1)\windows
[operating systems]
multi(0)disk(0)rdisk(0)partition(1)\windows=""
Note The value that is represented by the placeholder depends on the configuration of the Windows XP computer that you are trying to access. For example, if you are trying to start a Windows XP Professional computer, this value is as follows:
Microsoft Windows XP Professional
3. Click the File menu, and then click Save As.
4. Select 3 ½ Floppy (A:) from the Save in drop-down list, type Boot.ini in the File name text box, and then click Save.
Note If your computer starts from a SCSI hard disk drive, you may have to replace the multi(0) entry with scsi(0). If you are using scsi(x) in the Boot.ini file, copy the correct device driver for the SCSI controller that is used on the computer to the root of the boot disk, and then rename the device driver to Ntbootdd.sys. Change the disk(0) number to represent the SCSI-ID of the hard disk drive you want to start. If you are using multi(x) in the Boot.ini file, you do not have to change the code in the Boot.ini file.
4. Insert the floppy disk into the floppy disk drive of your computer, and then restart Windows XP.
Create a boot floppy disk without a Windows XP-based computer
1. To download and to create the Windows XP Setup boot disks from a computer that is running Microsoft Windows 95, Microsoft Windows 98, Microsoft Windows 98 Second Edition (SE), or Microsoft Windows Millennium Edition (Me), refer to Microsoft Knowledge Base article 310994. For more information, click the following article number to view the article in the Microsoft Knowledge Base:
310994 (http://support.microsoft.com/kb/310994/ ) How to obtain Windows XP Setup boot disks
2. Delete all the files from the newly created Setup disk 1.
3. Copy the Ntldr and the Ntdetect.com files from the I386 folder on the Windows XP installation CD-ROM, on the Windows XP installation floppy disk, or from a computer that is running the same version of Windows XP as the computer that you want to access by using the boot floppy disk. To do this, follow these steps:
1. Insert the Windows XP installation media into the disk drive of the computer.
2. Click Start, click Run, type:\I386, and then click OK.
Note represents the root location of the installation media.
3. Right-click the Ntldr file, and then click Copy.
4. Click Start, click Run, type a:, and then click OK.
5. Click the Edit menu, and then click Paste.
6. Repeat steps 2b through 2e for the Ntdetect.com file.
4. Rename the Ntldr file to Setupldr.bin. To do this, follow these steps:
1. Right-click the Ntldr file, and then click Rename.
2. Type Setupldr.bin, and then press ENTER.
5. Create a Boot.ini file or copy one from a computer that is running Windows XP, and then modify the Boot.ini file to match the computer that you are trying to access. The following example lists how to create a Boot.ini file for a single-partition Integrated Device Electronics drive with Windows XP installed in the \Windows folder:
1. Click Start, click Run, type notepad, and then click OK.
2. Type the following text :
[boot loader]
timeout=30
Default= multi(0)disk(0)rdisk(0)partition(1)\windows
[operating systems]
multi(0)disk(0)rdisk(0)partition(1)\windows=""
Note The value represented by the placeholder depends on the configuration of the Windows XP computer that you are trying to access. For example, if you are try to start a Windows XP Professional computer, this value is as follows:
Microsoft Windows XP Professional
3. Click the File menu, and then click Save As.
4. Select 3 ½ Floppy (A:) from the Save in drop-down list, type Boot.ini in the File name text box, and then click Save.
Note If your computer starts from a SCSI hard disk drive, you may have to replace the multi(0) entry with scsi(0). If you are using scsi(x) in the Boot.ini file, copy the correct device driver for the SCSI controller that is used on the computer to the root of the boot disk, and then rename the device driver to Ntbootdd.sys. Change the disk(0) number to represent the SCSI-ID of the hard disk drive you want to start. If you are using multi(x) in the Boot.ini file, you do not have to change the code in the Boot.ini file.
6. Insert the floppy disk into the floppy disk drive of your computer, and then restart Windows XP.
Troubleshooting
If the path that points to the system files is incorrect or includes the drive letter, you may receive the following error message:
Windows XP could not start because of the following ARC firmware boot configuration problem:
Did not properly generate ARC name for HAL and system paths. Please check the Windows XP (TM) documentation about ARC configuration options and your hardware reference manuals for additional information. Boot Failed.
If an incorrect SCSI driver has been selected or the Ntbootdd.sys file does not exist, you may receive the following error message:
Windows XP could not start because of a computer disk hardware configuration problem. Could not read from selected boot disk. Check boot path and disk hardware. Please check the Windows XP (TM) documentation about hardware disk configuration and your hardware disk configuration and your hardware reference manuals for additional information. Boot Failed.
Resolving startup issues with a boot floppy disk
You may be able to use a Windows XP bootable disk to start the operating system on a computer running Windows XP. Use the procedures in this article to work around the following boot issues:
* Damaged boot sector.
* Damaged master boot record (MBR).
* Virus infections.
* Missing or damaged Ntldr or Ntdetect.com files.
* Incorrect Ntbootdd.sys driver.
* To boot from the shadow of a broken mirror. Please note that you may need to modify the Boot.ini file to do this.
You cannot use the Windows XP boot disk to help resolve the following issues:
* Incorrect or damaged device drivers that are installed in the System folder.
* Boot issues that occur after you see the Windows XP startup (Osloader) screen.
Source http://support.microsoft.com/kb/305595
This step-by-step article describes how to create a bootable floppy disk for Windows XP to access a drive with a faulty boot sequence on an Intel-processor-based computer.
The Windows XP installation CD-ROM is a bootable disk and can be used to start Windows. When you use the Windows XP installation CD-ROM to start your computer, you can use the Windows Recovery Console to help recover the system software. For more information, click the following article number to view the article in the Microsoft Knowledge Base:
314058 (http://support.microsoft.com/kb/314058/ ) Description of the Windows XP Recovery Console
Note The procedure for RISC-based computers is different and not documented in this article.
Requirements
* A blank floppy disk
* The Windows XP CD-ROM or an operational Windows XP-based computer
Create a boot floppy disk by using a Windows XP-based computer
1. Format a floppy disk by using the Windows XP format utility. To do this follow these steps:
1. Insert the floppy disk that you want to use into the floppy disk drive.
2. Click Start, click Run, type format a:, and then click OK.
2. Copy the Ntldr and the Ntdetect.com files from the I386 folder on the Windows XP installation CD-ROM, from the Windows XP installation floppy disk, or from a computer that is running the same version of Windows XP as the computer that you want to access by using the boot floppy disk. To do this, follow these steps:
1. Insert the Windows XP installation media into the disk drive of the computer.
2. Click Start, click Run, type
Note
3. Right-click the Ntldr file, and then click Copy.
4. Click Start, click Run, type a:, and then click OK.
5. Click the Edit menu, and then click Paste.
6. Repeat steps 2b through 2e for the Ntdetect.com file.
3. Create a Boot.ini file, or copy one from a computer that is running Windows XP, and then modify the Boot.ini file to match the computer that you are trying to access. The following example lists how to create a Boot.ini file for a single-partition Integrated Device Electronics drive that has Windows XP installed in the \Windows folder:
1. Click Start, click Run, type notepad, and then click OK.
2. Type the following text:
[boot loader]
timeout=30
Default= multi(0)disk(0)rdisk(0)partition(1)\windows
[operating systems]
multi(0)disk(0)rdisk(0)partition(1)\windows="
Note The value that is represented by the
Microsoft Windows XP Professional
3. Click the File menu, and then click Save As.
4. Select 3 ½ Floppy (A:) from the Save in drop-down list, type Boot.ini in the File name text box, and then click Save.
Note If your computer starts from a SCSI hard disk drive, you may have to replace the multi(0) entry with scsi(0). If you are using scsi(x) in the Boot.ini file, copy the correct device driver for the SCSI controller that is used on the computer to the root of the boot disk, and then rename the device driver to Ntbootdd.sys. Change the disk(0) number to represent the SCSI-ID of the hard disk drive you want to start. If you are using multi(x) in the Boot.ini file, you do not have to change the code in the Boot.ini file.
4. Insert the floppy disk into the floppy disk drive of your computer, and then restart Windows XP.
Create a boot floppy disk without a Windows XP-based computer
1. To download and to create the Windows XP Setup boot disks from a computer that is running Microsoft Windows 95, Microsoft Windows 98, Microsoft Windows 98 Second Edition (SE), or Microsoft Windows Millennium Edition (Me), refer to Microsoft Knowledge Base article 310994. For more information, click the following article number to view the article in the Microsoft Knowledge Base:
310994 (http://support.microsoft.com/kb/310994/ ) How to obtain Windows XP Setup boot disks
2. Delete all the files from the newly created Setup disk 1.
3. Copy the Ntldr and the Ntdetect.com files from the I386 folder on the Windows XP installation CD-ROM, on the Windows XP installation floppy disk, or from a computer that is running the same version of Windows XP as the computer that you want to access by using the boot floppy disk. To do this, follow these steps:
1. Insert the Windows XP installation media into the disk drive of the computer.
2. Click Start, click Run, type
Note
3. Right-click the Ntldr file, and then click Copy.
4. Click Start, click Run, type a:, and then click OK.
5. Click the Edit menu, and then click Paste.
6. Repeat steps 2b through 2e for the Ntdetect.com file.
4. Rename the Ntldr file to Setupldr.bin. To do this, follow these steps:
1. Right-click the Ntldr file, and then click Rename.
2. Type Setupldr.bin, and then press ENTER.
5. Create a Boot.ini file or copy one from a computer that is running Windows XP, and then modify the Boot.ini file to match the computer that you are trying to access. The following example lists how to create a Boot.ini file for a single-partition Integrated Device Electronics drive with Windows XP installed in the \Windows folder:
1. Click Start, click Run, type notepad, and then click OK.
2. Type the following text :
[boot loader]
timeout=30
Default= multi(0)disk(0)rdisk(0)partition(1)\windows
[operating systems]
multi(0)disk(0)rdisk(0)partition(1)\windows="
Note The value represented by the
Microsoft Windows XP Professional
3. Click the File menu, and then click Save As.
4. Select 3 ½ Floppy (A:) from the Save in drop-down list, type Boot.ini in the File name text box, and then click Save.
Note If your computer starts from a SCSI hard disk drive, you may have to replace the multi(0) entry with scsi(0). If you are using scsi(x) in the Boot.ini file, copy the correct device driver for the SCSI controller that is used on the computer to the root of the boot disk, and then rename the device driver to Ntbootdd.sys. Change the disk(0) number to represent the SCSI-ID of the hard disk drive you want to start. If you are using multi(x) in the Boot.ini file, you do not have to change the code in the Boot.ini file.
6. Insert the floppy disk into the floppy disk drive of your computer, and then restart Windows XP.
Troubleshooting
If the path that points to the system files is incorrect or includes the drive letter, you may receive the following error message:
Windows XP could not start because of the following ARC firmware boot configuration problem:
Did not properly generate ARC name for HAL and system paths. Please check the Windows XP (TM) documentation about ARC configuration options and your hardware reference manuals for additional information. Boot Failed.
If an incorrect SCSI driver has been selected or the Ntbootdd.sys file does not exist, you may receive the following error message:
Windows XP could not start because of a computer disk hardware configuration problem. Could not read from selected boot disk. Check boot path and disk hardware. Please check the Windows XP (TM) documentation about hardware disk configuration and your hardware disk configuration and your hardware reference manuals for additional information. Boot Failed.
Resolving startup issues with a boot floppy disk
You may be able to use a Windows XP bootable disk to start the operating system on a computer running Windows XP. Use the procedures in this article to work around the following boot issues:
* Damaged boot sector.
* Damaged master boot record (MBR).
* Virus infections.
* Missing or damaged Ntldr or Ntdetect.com files.
* Incorrect Ntbootdd.sys driver.
* To boot from the shadow of a broken mirror. Please note that you may need to modify the Boot.ini file to do this.
You cannot use the Windows XP boot disk to help resolve the following issues:
* Incorrect or damaged device drivers that are installed in the System folder.
* Boot issues that occur after you see the Windows XP startup (Osloader) screen.
Source http://support.microsoft.com/kb/305595
Windows Mac Reinstall
To reinstall Mac OS X:
Step 1
Insert the Mac OS X Install Disc and double-click the Install Mac OS X icon.
Step 2
Follow the onscreen instructions. In the pane where you select the destination disk, select your current Mac OS X disk (in most cases, it will be the only one available).
Step 3
Click Options. If you want to save your existing files, users, and network settings, select “Archive and Install,” and then select “Preserve Users and Network Settings.” If you want to erase everything on your computer and reinstall Mac OS X, select “Erase and Install.” You can’t recover erased data.
Step 4
Click Continue.
Step 5
Click Customize to select which parts of Mac OS X you’d like to install, or click Install to perform a basic installation (recommended).
Source http://docs.info.apple.com/article.html?path=Mac/10.5/en/8177.html
Windows Mac installation
# 1
Insert the first OS X Install Disc into the CD-ROM drive of a computer other than the laptop on which you wish to set up the OS. The Install Assistant appears on the screen.
#
Step 2
Double-click the hard drive icon on the other computer if it is a Mac. If it is a PC with Windows, skip to Step 3. Open Applications and double-click Utilities. Launch the Remote Install Mac OS X application.
#
Step 3
Click Remote Install Mac OS X in the installation window on the screen if the other computer is a Windows PC. If the other computer is a Mac, refer back to Step 2.
#
Step 4
Click Continue in the Remote Install Mac OS X application. Click the icon for the OS disc in the CD-ROM drive and click Continue a second time.
#
Step 5
Choose an available network connection from the list of wireless and wired (e.g. Ethernet) networks and press Continue.
#
Step 6
Open the Mac laptop on which you wish to set up the OS without a CD-ROM drive. Click the Apple icon in the top left-hand corner of the screen and select Restart. Hold down the Option key on your laptop's keyboard while it is restarting. A list of possible start-up disks will appear on the screen during the rebooting process.
Source http://www.ehow.com/how_4895785_setup-os-laptop-cdrom-drive.html
Vista Upgrade Installation
Often times there is quite a bit of confusion about the word 'Upgrade' as it relates to operating systems. I want to make it clear that in this article, I'm talking about installing Vista on a system that already has a functional Windows operating system installed and that you are 'upgrading' that functional operating system to a version of Vista. In order to accomplish that task, the 'upgrade' process has to be started from inside the current Windows operating system. In theory, once this process has been completed, Vista will become the primary operating system on the machine, replacing what was there previously. You cannot 'roll back' to the previous operating system and restore the functionality present prior to the upgrade.
There are mechanisms built in to the install to help you determine if you want to upgrade. They appear on the first screen of the install routine and consist of "Check Compatibility Online" and 'Transfer Files And Settings From Another Computer' routines. I suggest you make use of both before committing to the upgrade process and pay special attention to the 'Compatibility Report' that will appear later as you move through the upgrade process. If something appears that is a cause for concern you still have the option to cancel before moving ahead with the upgrade.
To begin the upgrade process, insert the DVD and wait for the Install Windows screen to load. If you read through the Clean Installation guide you'll notice this screen has some different options.
Clicking 'Check Compatibility Online' takes you to the Windows Vista Upgrade Advisor site where it can be downloaded. It doesn't take long and I recommend you give it a try. It can point out areas that may negatively impact your decision to upgrade.
Because in this case install is running from inside XP, the 'Transfer Files And Settings From Another Computer' option is now available. As the name implies, this utility named 'Windows Easy Transfer' allows you to transfer files and settings from one computer to another using a variety of different methods.
Once you're ready to proceed with the installation, go ahead and click 'Install Now' to get things started.
The first order of business is to get any available installation updates. So far this has proven to be rather a hit or miss proposition for me. Sometimes it will connect and work as intended while other times I get a message telling me it was unable to connect.
If it works it's very convenient, especially for the hardware drivers, but even if it fails the updates can be downloaded and installed after installation is complete.
Once again it's time for the Product Key and talk about activation. Unlike XP and previous Windows offerings that stopped dead if you didn't have a product key, this is no longer the case with Vista. You aren't required to enter a key at this point, although there are some strongly worded cautions about the potential for data loss if you choose not to enter the key. There is also a check box to select whether or not Vista will be automatically activated.
If you chose not to enter the Product Key in the previous step, this screen will pop up asking you to confirm that you do not want to enter the key. The same warning of potential data loss is present and an additional warning has been added that you may need to purchase another edition of Vista if you continue without entering the key. Pressing [ Yes ] will return you to the screen where the key can be entered. Selecting [ No ] will take you to the screen below.
Declining to enter the product key in the previous step brings you here where you must select the edition of Windows that you purchased. The warning makes it clear that if you select a version you don't have a key for, you'll either have to purchase that version or reinstall Vista and select the proper version. This screen is a two step process; selecting the appropriate version and then certifying you have selected the version of Vista by using the checkbox. Once those two items have been completed the [ Next ] button is activated.
Next up is the Vista license terms. Simple choice; click [ I accept the license terms ] and the install continues. If you decide not to check the box you'll want to make use of that red 'X' in the upper right hand corner of the screen.
Now it's time to select the type of installation. Upgrade or Custom are the choices.
Had this installation started by booting the system with the DVD in the drive and then working your way to this point, the 'Upgrade' option would not have been available. Because the installation was started from inside XP, the 'Upgrade' option is available.
The 'Custom' option is also available if you decide you'd rather not upgrade but instead install a clean copy of Vista.
It's very important to note at this point that if you click on the 'Upgrade' option you are committed to the upgrade. There is no backing out. You will most likely see a 'Compatibility Report' screen if any issues exist with the install, but unless they are issues that would cause the upgrade to fail totally you will have to proceed with the upgrade.
If you select 'Custom' you are taken to the screen shown below where it asks where you want to install windows. Should you decide you really do want to upgrade instead, you can use the [ Back ] button to return to the previous screen and select 'Upgrade' option.
This is the screen I mentioned above that appears if you select the 'Custom' option.
Since there is only one drive available on this system the choice of where to perform the 'Custom' install is limited.
What's important to note is the statement at the bottom of the screen that if you want to make changes to partitions you have to restart Windows from the installation disk.
There are no disk tools available when the installation is started from inside Windows.
If you decide to go ahead and do the 'Custom' install you will be prompted that you are overwriting a previous Windows installation.
The files and folders are moved to the Windows.old folder, and as it says they will be accessible, but the previous operating system will no longer be functional.
Personally, I don't like this option. Every time I've used it I get the feeling the new installation performs less satisfactorily than a true clean installation. That may just be my imagination, but that's still the feeling I get. I much prefer to have the files backed up externally and do a clean install and not have them moved to Windows.old.
This is the Compatibility Report I mentioned previously. If you want to view the detected issues, click the link for more information. If you really don't care what the issues are and what impact they might have, click the [ Next ] button.
This is the detail of the Compatibility Report.
Once you've finished up the install location and click [ Next ] it's just a matter of waiting as Vista goes through the install motions. They are true to their word on this screen when they say the system will restart several times.
How long will it take to install Vista? I've experienced timeframes all over the spectrum from 30 minutes to over 5 hours, but for an 'Upgrade' install it's almost impossible to estimate. It depends on the complexity of the install and the amount of users, data, files, etc on the system being upgraded. I've read reports in newsgroups of people at the 10+ hour mark and the install was still chugging along. Add that as one more reason to avoid an 'Upgrade' installation.
If this was a clean installation that was being performed there would be five screens where you input specific user, network, updating, and time zone options and a 'Thank You' message for installing Vista. However, because this is an upgrade installation that was started from inside Windows, that information is already known and doesn't have to be entered as part of the upgrade process.
Because the system is connected to a network, setup wants to know whether the network is a home, work, or public location. Read the descriptions and select the one most suitable to your situation.
Earlier in the installation you saw a Compatibility Report screen containing a report about a PCI sound driver that could potentially be an upgrade issue.
This "Found New Hardware" screen is a direct result of the Compatibility Report and wants to search for the necessary driver online. You can grant permission to always search online anytime a driver is needed, grant permission to search this one time only, or deny permission to search online.
In this case the driver search was successful and the software for the device has been installed.
Source http://www.theeldergeekvista.com/vista_upgrade_installation.htm
Windows Vista Installation
How can I install Windows Vista?
As a Microsoft Windows Vista support professional, one of your tasks may be to install the operating system.
Step #1: Plan your installation
When you run the Windows Vista Setup program, you must provide information about how to install and configure the operating system. Thorough planning can make your installation of Windows Vista more efficient by helping you to avoid potential problems during installation. An understanding of the configuration options will also help to ensure that you have properly configured your system.
I won't go into that part right now (I might later this month, no promises...) but here are some of the most important things you should take into consideration when planning for your Windows Vista installation:
* Check System Requirements
* Check Hardware and Software Compatibility
* Determine Disk Partitioning Options
* Decide on a Workgroup or Domain Installation
* Complete a Pre-Installation Checklist
After you made sure you can go on, start the installation process.
Step #2: Beginning the installation process
You can install Windows Vista in several methods - all are valid and good, it all depends upon your needs and your limitations. In this manual I will focus on the simplest form of installation - directly from the Windows Vista DVD media.
More on other forms of installation can be found in the Windows Vista Information, Tweaking, Tips and Tricks section.
So, insert your Windows Vista DVD media into your DVD drive and reboot your computer. A black window will appear momentarily while the DVD content is read.
Step #3: The GUI-based portion of the Setup program
Unlike previous versions of Windows, Windows Vista does not have a noticeable text phase of the setup process, and it will boot directly into the Graphical User Interface (GUI) mode.
1. After a few moments you will see the first prompt:
Press Next unless you want to change some regional settings for the installation process.
1. Press the Install now button.
1. After a short delay you're be prompted to enter your product key:
You can skip this part if you don't have the product key handy (read Install Windows Vista Without Supplying the Product Key for more info). However, if you do have a valid product key at that time (and you should have one, we're dealing with legal issues here), then by entering the right key the setup program knows which version of Vista to install.
If you skip it, you'll be prompted for a Vista version that matches your product key (the one you don't have handy at that moment):
1. You now have to accept the license terms:
1. Next you need to press the Custom (Advanced) installation type button:
The Upgrade button is disabled because this specific installation if performed on a new computer without any previous operating system on it.
1. The next phase is to pick the installation partition. Since this computer has a new hard disk that hasn't been formatted before, you will only have the option to create a new partition on it. Had it had previous partitions on it you could have chosen to either delete them or perform other tasks. Pressing the Advanced button will bring up the following options.
Since we don't need to perform any additional task we will just press on the Next button. The installation process will then create a partition on all the available disk space, and format it.
1. The setup process will now begin to copy files from the installation DVD media to the hard disk.
This will take some time:
1. After some time (the exact amount of time will greatly depend on your computer's hardware), the setup process will install updates for the operating system.
1. The computer will then automatically reboot.
1. Now comes a long waiting period, where the installation process configures the system. Again, the exact amount of time will greatly depend on your computer's hardware.
1. After the long wait, the system will then reboot once again.
2. You will think something went wrong because of the relative long time it take the system to display anything besides the black screen, but finally, after a few moments you will note a small colored circle:
1. A few seconds after that you will be prompted to enter a username and password for the first user on the computer.
Although the setup program will let you continue without entering a password, note that it is very advisable to enter a password here, and the best option would be to choose a complex password made of at least 7 characters or more (something like P@ssw0rd or MYpa$$w0rd). Make sure you remember it.
Also pick your user's display picture. This can be changed later.
1. Pick a name for your computer. The setup program will create one based upon the username you chose in the previous step, but you can change it now (and later).
Also pick a background for the user's desktop. This can be changed later.
1. Choose what sort of protection your computer gets. The recommended settings are best for someone that doesn't plan to hide their computer behind a corporate firewall (and even then, in some cases, this would be the best option). If you plan to install a 3rd-party firewall later you can opt to be prompted later.
Note that this setting will also have effect on how the computer uses the Microsoft Windows Update (Automatic Updates) features.
1. Next comes the Time Zone settings window. Choose your location.
A note for Israeli users: Finally! Windows Vista has the DST setting enabled for us!!!
1. Done! You're prompted with the last setup screen:
1. Again a long wait and some promotional screens you see the hourglass circling around, in preparation for the first logon.
1. Finally, the first screen appears, you're ready to rock and roll!
Note that if the computer was connected to the Internet while installing it, it will automatically download and prompt you to install any missing hotfix or update it finds for the current state of the operating system.
Done!
Source http://www.petri.co.il/install_windows_vista.htm
Windows 98 Installation
INTRODUCTION
What you will require to do this walkthrough is
1.
A Windows 98 CD
2.
A Computer with CD-ROM access
To start this Windows install. First check that the first boot device in your system BIOS is set to the CD-ROM Drive.
( To find out how to access the BIOS please refer to your motherboard manual or the manufacturer of your computer. (The system bios can usually be entered on boot, usually by pressing the F1, F2, F8, F10 or DEL key. Make sure you save the settings before exiting))
If you are unsure or don't want to enter the BIOS then just test the computer by putting the CD-ROM in the drive and rebooting the computer. This is the recommended way to install windows.
You will know that your computer will/has booted of CD-ROM when the following screen appears.
PART 1
To begin the Windows 98 install select Option 2 (Boot from CD-Rom)
The following screen will appear next. Select Option 1. (Start Windows 98 Setup from CD-ROM)
Your CD-ROM driver will now install, be patient this may take a few moments.
Now press Enter to continue, or F3 to exit.
Setup will now perform checks on your system, press Enter to continue.
Next Scandisk will run, let this complete or setup.
Now setup will copy important files for the install.
PART 2
Setup has now begun, the mouse should now be active, press Continue to proceed. If you have a change of mind then press Exit Setup. If the mouse is not active press "ENTER" on the keyboard.
The wizard will now start. Be patient this may take a few moments.
Now select the directory you wish to install Windows into. By default C:\Windows will be selected. You can change this, but it is not advised. Click on Next to Continue.
Setup will now prepare the directory, be patient this may take a moment.
Setup now checks disk space.
What do you wish to install. We recommend Typical, which is the default. So click Next to continue.
Windows Components to be installed will now be listed. Leave at default and press Next.
If a Network card has been detected the following will appear. Fill in the details and click Next.
Now your country settings, select as needed and then press Next.
Windows will now copy files, this will take sometime. Be patient
PART 3
After sometime you will be prompted to restart, Windows will do it itself, you can click on Restart Now to quicken the process.
The CD-ROM boot menu will appear. Select option 1 (Boot from Hard Disk)
Booting for first time screen will appear.
Now enter your name, company is optional. Click on Next to continue.
Now the License Agreement. Read and if you agree click on "I accept the Agreement" and click next. If you select ""I don't accept the Agreement" then setup will end.
Now input your product key or certificate authenticity code. This is 16 digits and is located on the back of your CD case or on the Windows 98 Book. If you have an OEM computer then it could be on the side or back of your computer. Click next to continue.
Next click on Finish.
PART 4
Setup will now finalize the hardware and install settings.
Plug and Play Devices.....
Your computer will prompt to restart....
The CD boot menu will appear. Select option 1 (Boot from Hard Disk) and press enter.
Windows is booting.
and continuing the install of devices.
PART 5
Now select your date/time settings, using the down arrow beside GMT -0800.
Once selected click on apply and then OK.
Windows will continue to setup Windows items.
The computer will now need restarted again.
PART 6
The CD-ROM boot menu will appear. Select Option 1 (Boot from Hard Disk) and press enter.
Windows will continue to load.
and update System Settings.
At long last you have arrived at the desktop.
If you are lucky you will have no drivers to install, but chances are the next step will be to install them. Check out device manager for unknown devices, likely items are Network Cards, Sound Cards, Printers, Scanners, Graphics Cards, Digital Cameras, plus any other item you have.
Source http://www.windowsreinstall.com/win98/install98cd/indexfullpage.htm
How to Perform an In-Place Upgrade (Reinstallation) of Windows XP (Q315341)
The information in this article applies to:
* Microsoft Windows XP Home Edition
* Microsoft Windows XP Professional
SUMMARY
This article explains how to perform an in-place upgrade, or reinstallation, of Windows XP. This is also called a repair installation.
When you perform an in-place upgrade of Windows XP, you reinstall Windows to the same folder. You may want to do this if you need to repair your installation of Windows XP. To reinstall Windows XP, use either of the following methods.
MORE INFORMATION
Before You Perform an In-Place Upgrade
IMPORTANT : ?
* If your computer came preinstalled with Windows XP, please see the following article in the Microsoft Knowledge Base before you follow the steps later in this article:
Q312369 May Lose Data or Program Settings After Reinstalling Windows XP
* If you perform an in-place upgrade of Windows XP, all existing restore points are removed and a new System Checkpoint restore point is created after the in-place upgrade is complete. Do not perform an in-place upgrade if you may need to use System Restore to roll your system back to a previous state.
For additional information, click the article number below to view the article in the Microsoft Knowledge Base:
Q301224 System Restore 'Restore Points' Are Missing or Deleted
* Backup copies of your registry files (in the %systemroot%\Repair folder) are also replaced after the in-place upgrade is complete. The registry files in the Repair folder are either from the first time you started Windows XP or the last time you used the Backup utility to backup your System State. Copy these registry backups to another location before you perform an in-place upgrade if you may need to use them after the in-place upgrade is complete.
Method 1: Reinstall Windows XP from Within Windows XP
To reinstall Windows XP from within Windows XP, follow these steps:
1. Start your computer.
2. Insert the Windows XP compact disc into your computer's CD-ROM or DVD-ROM drive.
3. On the Welcome to Microsoft Windows XP page that appears, click Install Windows XP .
4. On the Welcome to Windows Setup page, click Upgrade (Recommended) in the Installation Type box (if it is not already selected), and then click Next .
5. On the License Agreement page, click I accept this agreement , and then click Next .
6. On the Your Product Key page, type the 25-character product key in the appropriate Product key boxes, and then click Next .
7. On the Get Updated Setup Files page, select the option that you want, and then click Next .
8. Follow the instructions on the remaining pages of the Windows XP Setup Wizard to reinstall Windows XP.
Method 2: Reinstall Windows XP by Starting Your Computer from the Windows XP Compact Disc
To reinstall Windows XP by starting your computer from the Windows XP compact disc or from MS-DOS mode, or by starting your computer from a Microsoft Windows Millennium Edition (Me) or Microsoft Windows 98 startup disk, follow these steps:
1. Do one of the following:
* If you want to reinstall Windows XP by starting your computer from the Windows XP compact disc, insert the Windows XP compact disc into your computer's CD-ROM or DVD-ROM drive, and then restart your computer.
When the "Press any key to ? boot from CD" message is displayed on the screen, press a key to start your computer from the Windows XP compact disc.
NOTE : Your computer must be confi?ured to start from the CD-ROM or DVD-ROM drive. For more information about how to configure your computer to start from the CD-ROM or DVD-ROM drive, please see your computer's documentation or contact your computer manufacturer.
-or-
* If you want to reinstall Windows XP from MS-DOS mode by starting your computer from a startup disk, follow these steps:
1. Insert the Windows XP compact disc into your computer's CD-ROM or DVD-ROM drive.
2. Insert the Windows Me or Windows 98 startup disk into your computer's floppy disk drive, and then restart your computer.
3. When the Windows Startup menu appears, select Start Computer with CD-ROM Support .
4. Make a note of the drive letter of your CD-ROM drive -- for example, E.
NOTE : Before you proceed to the next step, you may want to run SMARTDrive (Smartdrv.exe). If you do not use SMARTDrive, the portion of Windows XP Setup that copies files to the hard disk may perform very slowly.
For additional information, click the article number below to view the article in the Microsoft Knowledge Base:
Q296814 Setup Stops Responding (Hangs) During File Copy
5. At the command prompt, type the following lines, and be sure to press ENTER after each line
e:
cd i386
winnt.exe
where E is the drive letter of the CD-ROM or DVD-ROM drive that contains the Windows XP compact disc.
6. Type the path to the Windows XP installation files, and then press ENTER. For example, type e :\i386 , where E is the drive letter of the CD-ROM or DVD-ROM drive that contains the Windows XP compact disc.
7. When you see following message displayed on your screen, remove the startup disk from your computer's floppy disk drive, and then press ENTER:
The MS-DOS based portion of the Setup is complete.
Setup will now restart your computer. After your computer restarts,
Windows XP Setup will continue.
If there is a floppy disk in drive A; remove it now.
Press ENTER to restart your computer and continue Windows XP Setup.
The computer restarts and Setup resumes.
2. The following message is displayed on the Welcome to Setup screen that appears:
This portion of the Setup program prepares Microsoft
Windows XP to run on your computer:
To setup Windows XP now, press ENTER.
To repair a Windows XP installation using Recovery Console, press R.
To quit Setup without installing Windows XP, press F3.
Press ENTER to set up Windows XP.
3. On the Windows XP Licensing Agreement screen, press F8 to agree to the license agreement.
4. Make sure that your current installation of Windows XP is selected?in the box, and then press R to repair Windows XP.
5. Follow the instructions on the remaining screens to reinstall Windows XP.
After you repa?r Windows XP, you may be required to reactivate your copy of Windows XP.
For additional information, click the article number below to view the article in the Microsoft Knowledge Base:
Q310064 HOW TO: Troubleshoot Windows XP Setup Problems When You Upgrade from Windows 98 or Windows Me
For additional information about how to troubleshoot specific Windows XP Setup issues, click the article numbers below to view the articles in the Microsoft Knowledge Base:
Q312369 You May Lose Data or Program Settings After Reinstalling, Repairing, or Upgrading Windows XP
Q312368 Data Loss May Occur After Reinstalling, Repairing, or Upgrading Windows XP
For additional information about Windows XP Setup, click the article numbers below to view the articles in the Microsoft Knowledge Base:
Q286463 Release Notes for Windows XP Setup Contained in the Pro.txt File
Q306824 Release Notes for Windows XP Setup Contained in the Home.txt File
Q286647 Windows XP Read1st.txt File Contents
Source http://paulscomputershoppe.net/UpgradeofWindowsXP.html
Subscribe to:
Comments (Atom)
