I think we can all agree that a developer needs a fine-tuned, well-running machine. By doing regularly scheduled maintenance to your development PC, you can avoid programming down-time. Yesterday my computer was performing sluggishly and I realized I was long overdue for a Defrag.
Prior to running Defrag on your computer, you should run a Scandisk to correct any drive errors. In Windows 98, (and this is likely similar in Windows 2000), go to your Desktop, open My Computer, right click on the drive on which you wish to run Scandisk, and then select Properties. A window will come up. Select the "Tools" tab.
The Error-checking status box will tell you when you last ran a Scandisk. Select the "Check Now" button. Another window will open. Select the "Thorough" radio button and the checkbox to "Automatically fix errors," then select the "Start" button.
I also noticed that when I ran a Scandisk from DOS, it found no errors. But when I ran it on the same drive from Windows, the Windows Scandisk version found and fixed several errors.
Once Scandisk has completed, select the "Defragment Now" button to begin the Defragmentation process.
It is important that you do not have any applications open and are not using your PC while you are running these tools, as they won't be able to complete and will keep restarting the process. Run these during evenings or times you won't need to be working on your PC.
Unfortunately, when I ran Scandisk on my C: drive, it kept restarting and I eventually got the message that Scandisk had restarted 10 times due to another application writing to the hard drive.
I had shut down every application, closed everything in my task bar, and even shut down my network, but still I kept getting this error. I decided to bypass the Scandisk and go straight to the Defrag, but it would never get past 0% completion while checking for errors.
If this problem ever happens to you, here's what I found out to fix it.
Do a Restart or Shutdown and Restart (I prefer a Shutdown so I can do a clean boot), and while restarting, hold down the F8 key. This will bring up a DOS option to boot Windows in Safe Mode. Select the Safe Mode. Your PC will now open with no applications running in the background.
Follow the same instructions above for running Scandisk and Defrag. Now both should successfully complete on Drive C.
Source http://www.shiningstar.net/articles/articles/misc/scandefrag.asp?ID=aw
Wednesday, November 4, 2009
How to Set BIOS to Boot from CDROM:
All modern Computer Systems manufactured in the last years, support boot from cd feature, but it may be required to configure this feature in bios or previous owner of your computer system may have disabled this feature or may have changed the boot priority sequence )
When you start your computer, check the boot-screen for setup key, In most newer pc it will be DELETE key, so make sure to check it.
This AmiBios Require you to press DEL key to enter setup
now you will see some similar screen and choose the BOOT option and choose Boot Device Priority and choose first boot device to CDROM and second boot device to HARD DRIVE You can press F10 to save settings.
On Award Bios you will see some similar screen and choose the right key to Enter setup
Now choose Advanced Bios Features
and set First Boot Device to CDROM and Second or third to HDD-0 and Press F10 to save it.
On some Dell Systems you can enter bios by pressing F2
Now choose Boot Sequence and then arrance 1 to CD-Rom by pressing - + and press space to enable it
Press ESC and choose save settings and exit
On some Dell Systems you can enter bios by pressing F2
Sometimes you can press F12 to temporary boot from cd on some Dell Systems
Press F2 to enter bios setup
and set Boot Sequence to A,CDROM,C and Press Esc and then F10 to save it.
Some Computer has Option to temporary boot from Cd/Hdd/Floppy/Usb Device, Just keep tapping the F8 button to get Boot Menu and Now choose your manufacture of CDRom.
Source http://www.hiren.info/pages/bios-boot-cdrom
Dell 400SC Motherboard Capacitor Problems
This page documents some problems that I have run into with two Dell 400SC Server motherboards.
Motherboards that were built in a specific time period seem to be developing problems with electrolytic capacitors that are failing sometime after the first year of service.
Similar problems were found with a variety of motherboards in the 2000-2001 timeframe. Even though the problems are similar, it seems that the problems with the Dell 400SC are unrelated to the large quantity of poor quality capacitors that were on the market in 2000-2001. This batch of problems seems to be more of a specific quality control problem at a single manufacturer during a particular time period.
See these links for some more details on the problems the sometimes occur with electrolytic capacitors on modern motherboards, where high frequency currents seem to push the envelope of what these devices can be expected to handle:
* Badcaps.net tracked the initial set of motherboard capacitor problems.
* Tecnopolis Enterprises is an outfit in Winnipeg that has good information on the issue, and provides a repair service: http://www.tecnopolis.ca/tecnopolis/leakycaps.html
* Aaltonen hosts a message board that discusses the 400SC (and some other Dell machines). Here is a thread that discusses the 400SC specific problem: http://www.aaltonen.us/forums/viewtopic.php?t=2376
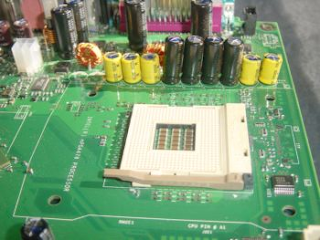
Here are some photos of the problematic capacitors on my motherboards: Motherboard 1 is Revision A02 - it did not exhibit any noticeable problems when running; however, the capacitors look worse than my other motherboard, as a couple of them are 'oozing' whatever is inside those things.
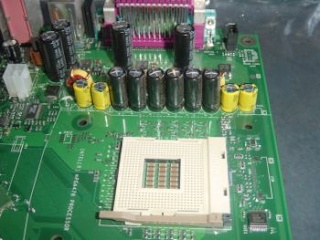
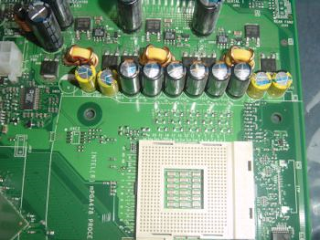
Motherboard 2 exhibited numerous strange failures - out of memory conditions, refusing to run programs due to inadequate permissions, reboots, etc. I spent a significant amount of time trying to fix these problems, assuming that they were 'malware' related. After trying to diagnose and/or fix the problem with several anti-virus and spyware removal utilities, I happened across the thread on the Aaltonen forum describing the capacitor problem. When I inspected the motherboard, sure enough the capacitors were bulging.

And this is a photo of a plastic standoff that Dell uses to attach the heatsink bracket to the motherboard/motherboard-tray. I damaged it when preparing the motherboard for shipment - I think that it's probably still OK to use.
Source http://www.interslice.org/dell400sc/capacitors
Motherboards that were built in a specific time period seem to be developing problems with electrolytic capacitors that are failing sometime after the first year of service.
Similar problems were found with a variety of motherboards in the 2000-2001 timeframe. Even though the problems are similar, it seems that the problems with the Dell 400SC are unrelated to the large quantity of poor quality capacitors that were on the market in 2000-2001. This batch of problems seems to be more of a specific quality control problem at a single manufacturer during a particular time period.
See these links for some more details on the problems the sometimes occur with electrolytic capacitors on modern motherboards, where high frequency currents seem to push the envelope of what these devices can be expected to handle:
* Badcaps.net tracked the initial set of motherboard capacitor problems.
* Tecnopolis Enterprises is an outfit in Winnipeg that has good information on the issue, and provides a repair service: http://www.tecnopolis.ca/tecnopolis/leakycaps.html
* Aaltonen hosts a message board that discusses the 400SC (and some other Dell machines). Here is a thread that discusses the 400SC specific problem: http://www.aaltonen.us/forums/viewtopic.php?t=2376
Here are some photos of the problematic capacitors on my motherboards: Motherboard 1 is Revision A02 - it did not exhibit any noticeable problems when running; however, the capacitors look worse than my other motherboard, as a couple of them are 'oozing' whatever is inside those things.


Motherboard 2 exhibited numerous strange failures - out of memory conditions, refusing to run programs due to inadequate permissions, reboots, etc. I spent a significant amount of time trying to fix these problems, assuming that they were 'malware' related. After trying to diagnose and/or fix the problem with several anti-virus and spyware removal utilities, I happened across the thread on the Aaltonen forum describing the capacitor problem. When I inspected the motherboard, sure enough the capacitors were bulging.


And this is a photo of a plastic standoff that Dell uses to attach the heatsink bracket to the motherboard/motherboard-tray. I damaged it when preparing the motherboard for shipment - I think that it's probably still OK to use.
Source http://www.interslice.org/dell400sc/capacitors
Windows 7 Beta step by step Installation procedure
Microsoft recently announced the public release of its new operating system Windows 7 beta version. This is available for download both for x86 (32-bit) and X64 (64-bit) hardware. For more information on system requirements and downloads, click here
If you have already installed WIndows Vista or Windows Server 2008 from scratch then this shouldn’t look too different for you.
Boot with the installation media and once past through the initial splasdh screen, select the Language and regional settings including keyboard layout and click Next.
Click Install Now button
windows7-2
Accept the License terms and click Next
windows7-3
Select Custom (advanced) option to perform a fresh installation
windows7-4
Select the disk and partition it if necessary and click next
windows7-5
This should start copying the files, expand it and perform feature and update installation and reboot your PC.
windows7-6
After reboot the installation continues the configurations and reboot again for first login.
windows7-7 windows7-8
Windows will take you through the initial setup of your PC, starting with setting up a user and the name of the PC. Once entered, click next
windows7-9 windows7-10
Set the password for the user and click Next
windows7-11
Enter the product key. At the time of Download, Microsoft would have provided you with a product key for evaluation valid until the 1st July 2009. Enter the key and click Next
windows7-12
Setup Windows Updates as per your requirement (default to install recommended and important updates is recommended)
windows7-13
Set the date and time for your PC and the Day light savings for your country (if any) and click next
windows7-14
Setup your Network type. This should try and connect to your Network
windows7-15
Windows will then setup a password for your homegroup (similar to the Workgroup in Windows XP and earlier). You can choose to skip this step if you want to configure it later.
windows7-16
This should finalize the settings and launch you straight into your desktop.
windows7-17 windows7-18
There you go, your new Windows 7 Beta up and running. First outlook looks to be good for a Beta version of a Microsoft Operating System.
windows7-20 windows7-21
Have fun!!!
Gallery
The following is the Screenshot gallery from Windows 7 beta installation…
Source http://www.windowsreference.com/windows-7/windows-7-beta-step-by-step-installation-procedure/
Windows 2000 Professional Full Install Procedure
NB: If rebuilding an existing, working computer, first:
- Backup all user data
- Write down all device information (names of cards etc.) and IP settings.
0. CMOS/BIOS SETTINGS (Hit DEL or F2 during startup, according to prompt)
Ensure that boot sequence is CD-ROM, Floppy, Hard Drive
Ensure that Plug-and-Play (PNP) OS is enabled
1a. If computer is incapable of booting from CDROM, then first prepare four install floppies, using CDROM. Boot from floppy, and it will prompt to load all four into RAM. (This procedure takes about 10 minutes.) Insert Windows 2000 Full Install CDROM.
1b. Otherwise, insert Windows 2000 Full Install CDROM and reboot.
2. Hit ENTER to install Windows 2000.
3. Hit C to continue.
4. Hit the F8 key to agree to license agreement.
5. Hit D to delete any existing disk partitions.
6. Hit C to create new partition.
7. Hit ENTER to accept the default (one big partition.) Note there may be some space left over. That’s OK.
8. ENTER to install windows on this partition.
9. ENTER to format the partition as NTFS.
10. Wait while the drive is formatted, files copied from the CD. The machine will reboot itself.
11. ENTER to accept locale and keyboard settings.
12. Type computer name and school name in the appropriate slots, hit ENTER.
13. Type the computer name. Type the Administrator password TWICE. Password will show as all asterisks. ENTER.
14. Modify the date, time and time zone as needed. ENTER.
15. Click to select “Custom settings”. ENTER.
16. Click to remove the check next to “File and Printer Sharing for Microsoft Networks”. ENTER.
17. Leave “This computer is not on a network or is on a network without a domain” selected (or if a PDC is available, selected the domain option). Type EPAHS in the Workgroup (or Domain) field. ENTER.
18. Remove CD from drive. ENTER.
Computer will reboot. ENTER.
19. Select “User must enter a user name and password to use this computer.” ENTER. ENTER again.
20. Log into computer as Administrator, using the password you entered in step 13. ENTER.
21. Disable the WELCOME Screen.
22. Double-click the “Connect to the Internet” icon on the desktop. Select “I want to set up my Internet connection manually, or I want to connect through a local area network (LAN).” OK.
23. Select “I connect through a local area network (LAN).” ENTER. ENTER again.
24. Select NO to setting up email. OK. OK again.
25. Right-click on “My Network Places”. Click Properties.
Right-click on “Local area network”. Click Properties.
Click on “Internet Protocol (TCP/IP)” so that it turns blue. Click Properties.
Select “Use the following IP address”.
Type in the IP address, subnet mask, gateway and DNS addresses you wrote down before. Click OK.
26. Change the Resolution (by right clicking on the desktop and selecting Properties:
24 bit True Color
800 x 600
Advanced -> Adapter -> Refresh Rate -> 75 Hz
YES ... OK ... OK ... OK ... (Joe Pesci mode)
Now adjust monitor physical wheels as needed.
27. Set the ScreenSaver to show the computer name:
Right-click on desktop, select Properties
-> Screensaver Tab
-> Text = “PC01 Welcome To EPAHS PC01”
-> Speed = Medium
-> Location = Random
-> Font = Terminal
-> Size = 72
-> Wait = 10 minutes
-> Color = your choice
Energy Saver: Turn off monitor after 30 minutes
Source http://www.learningtech.org/services/cto/epahs/win2khtml/win2kinstall.html
Windows Vista consumer security software providers
We recommend that you install security software to help protect your computer from viruses and other security threats, and that you keep your security software up to date.
Some companies use products that appear to be antivirus programs to install viruses or malware on your computer. When you install the program, you might also be installing the virus or other malware, without knowing it. Many companies, including those listed on this page, distribute antivirus programs. You should carefully investigate the source of antivirus and other products before downloading and installing them.
The companies listed below provide consumer security software that is compatible with Windows Vista. Just click the company name to see the Windows Vista-compatible product they offer. For business security software that is compatible with Windows Vista, please visit the Windows Vista Compatibility Center or contact your security vendor of choice.
Important: Before you install antivirus software, check to make sure you don't already have an antivirus product on your computer. If you do, be sure to remove the product you don't want before you install the new one. It can cause problems on your computer to have two different antivirus products installed at the same time.


Source http://www.microsoft.com/windows/antivirus-partners/windows-vista.aspx
Home Network Setup - Setting up a Local Area Network
....With computers getting cheaper and cheaper these days, it is not uncommon for a household to have more than one PC. If that describes you, then you have probably found yourself in the situation where you wished you could access the other PC to retrieve a file, use the printer attached to the other PC, play multi-player computer games, or most importantly share your broadband Internet access such as cable or DSL modem with the other PC.
To accomplish this all you need is a home network where you connect two or more PCs. There are several ways of doing this with the main difference being cost, security, and reliability. Let's first look at the different scenarios.
Your current setup
Most likely, your current configuration looks like this:
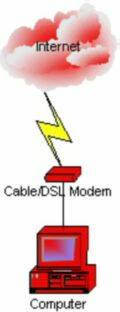
Your cable/DSL modem plugs straight into the computer. The computer is exposed to the public Internet (indicated by the color red). There is no connection for more than one computer. You only have one IP address from your ISP.
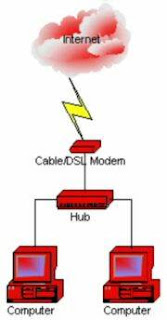
Option #1: Multiple IP addresses
An easy way of getting the second PC online is to install a network card in it, buy a hub, plug both PCs and the cable/DSL modem into the hub, call your ISP and get a second IP address and configure the second PC accordingly.
It is what your ISP most likely will try to talk you into doing.
Advantages:
* the two PCs are independent from each other
* relatively easy setup
Disadvantages:
* Both PCs are exposed to public Internet
* Enabling file sharing adds security risk
* Higher monthly ISP cost for additional IP addresses
Option #2: Internet Connection Sharing via Software
In this scenario, you install a second network card in the computer that is connected to the Internet, install a network card in the second PC, connect them via a CAT5 cable. You configure the connection between PC 1 and PC 2 as a private network, then install and configure Internet Connection Sharing software (ICS) on PC 1, lastly configure PC 2 to access the Internet via PC 1.

Probably the cheapest solutions of them all, but also the least reliable one.
Advantages:
* cheap, only requires 2 network cards and Cat5 cable
* ICS software is available for free with newer versions of Windows or online as freeware
* No additional ISP cost
Disadvantages:
* One PC is exposed to public Internet
* Can be difficult to configure
* If PC 1 is shut down or broken, PC 2 cannot get online
* Can be unreliable
* Limited number of PCs
Option #3: Using a hardware router/gateway/firewall device
In this scenario, you install a hardware router/gateway/firewall device, connect the public side to your cable/DSL modem, connect the private side to a hub, connect all PCs to the hub, configure all PCs for your private network.
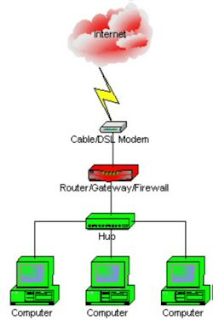
While the costliest solution, by far the safest, most reliable, and most scalable one. Highly recommended.
Advantages:
* All PCs are protected by firewall (indicated by the color green)
* File sharing between PCs is safe
* No additional ISP cost
* Connect many PCs to home network without additional cost
* Easy PC configuration due to DHCP server in gateway device
* Optional additional functionality with gateway-integrated wireless access point, print server, DMZ, content filtering, and more
Disadvantages:
* Can cost several hundred dollars depending on gateway device and features
* Somewhat of a learning curve
As you have probably figured out by now, option #3 is the most desirable solution because it gives you a protected private network, it is a very stable solution, it is easily and extremely expandable, and it gives you the most features.
Note: This article assumes that your cable/DSL modem uses an Ethernet connection, NOT a USB connection because it will eliminate options #1 and #3. If your ISP gives you a choice, insist on getting the modem with an Ethernet connection.
Source http://www.pcnineoneone.com/howto/hmnetwk1.html
To accomplish this all you need is a home network where you connect two or more PCs. There are several ways of doing this with the main difference being cost, security, and reliability. Let's first look at the different scenarios.
Your current setup
Most likely, your current configuration looks like this:

Your cable/DSL modem plugs straight into the computer. The computer is exposed to the public Internet (indicated by the color red). There is no connection for more than one computer. You only have one IP address from your ISP.
Option #1: Multiple IP addresses
An easy way of getting the second PC online is to install a network card in it, buy a hub, plug both PCs and the cable/DSL modem into the hub, call your ISP and get a second IP address and configure the second PC accordingly.

It is what your ISP most likely will try to talk you into doing.
Advantages:
* the two PCs are independent from each other
* relatively easy setup
Disadvantages:
* Both PCs are exposed to public Internet
* Enabling file sharing adds security risk
* Higher monthly ISP cost for additional IP addresses
Option #2: Internet Connection Sharing via Software
In this scenario, you install a second network card in the computer that is connected to the Internet, install a network card in the second PC, connect them via a CAT5 cable. You configure the connection between PC 1 and PC 2 as a private network, then install and configure Internet Connection Sharing software (ICS) on PC 1, lastly configure PC 2 to access the Internet via PC 1.

Probably the cheapest solutions of them all, but also the least reliable one.
Advantages:
* cheap, only requires 2 network cards and Cat5 cable
* ICS software is available for free with newer versions of Windows or online as freeware
* No additional ISP cost
Disadvantages:
* One PC is exposed to public Internet
* Can be difficult to configure
* If PC 1 is shut down or broken, PC 2 cannot get online
* Can be unreliable
* Limited number of PCs
Option #3: Using a hardware router/gateway/firewall device
In this scenario, you install a hardware router/gateway/firewall device, connect the public side to your cable/DSL modem, connect the private side to a hub, connect all PCs to the hub, configure all PCs for your private network.

While the costliest solution, by far the safest, most reliable, and most scalable one. Highly recommended.
Advantages:
* All PCs are protected by firewall (indicated by the color green)
* File sharing between PCs is safe
* No additional ISP cost
* Connect many PCs to home network without additional cost
* Easy PC configuration due to DHCP server in gateway device
* Optional additional functionality with gateway-integrated wireless access point, print server, DMZ, content filtering, and more
Disadvantages:
* Can cost several hundred dollars depending on gateway device and features
* Somewhat of a learning curve
As you have probably figured out by now, option #3 is the most desirable solution because it gives you a protected private network, it is a very stable solution, it is easily and extremely expandable, and it gives you the most features.
Note: This article assumes that your cable/DSL modem uses an Ethernet connection, NOT a USB connection because it will eliminate options #1 and #3. If your ISP gives you a choice, insist on getting the modem with an Ethernet connection.
Source http://www.pcnineoneone.com/howto/hmnetwk1.html
Subscribe to:
Posts (Atom)
